
Air pollution lurks all around us, preying upon the young and old. It slips in unnoticed and travels through your defences. They seriously assault the lungs, heart, and even our nervous system. Its deadliest weapon is to be invisible and poisonous particles that are as small as molecules. With every breath, they break through your lung’s protective barriers and trigger information as your system tries desperately to fight back.
however, These tiny intruders can even penetrate those defences, lodging toxic compounds deeper, sowing the seeds of cancer. They slide straight into your bloodstreams, sabotaging your entire bodily functions.
Let us stop this invisible killer together.

Good air quality around us is necessary for a better lifestyle. This proposed project aims to monitor the degree of the pollutants present in the surrounding every second. I will recommend placing the Air Pollution Monitoring system upon a drone or moving cart, incorporated with GPS or a location tracking device for better recordings from the area.
For achieving a successful air pollution monitor, we need:
- Gas sensor:
It detects the pollutants and calculates the degree of pollution, taking the surrounding air quality conditions into account.
- Buzzer:
It produces an alarming sound when the degree of pollution exceeds the desired limits.
- LED light:
They function along with the equipped buzzer with the system. To alarm the user, they glow, which indicates the pollution level is beyond the limits.
- Breadboard:
It is a connection board for all the components with the Arduino board.
- Resistor:
To limit the electric current flow and divide voltage in the circuit.
- Arduino board:
This act as the brain for the entire system
All the mentioned components have to be fault-free and connected, according to the circuit diagram mentioned.
Circuit Diagram
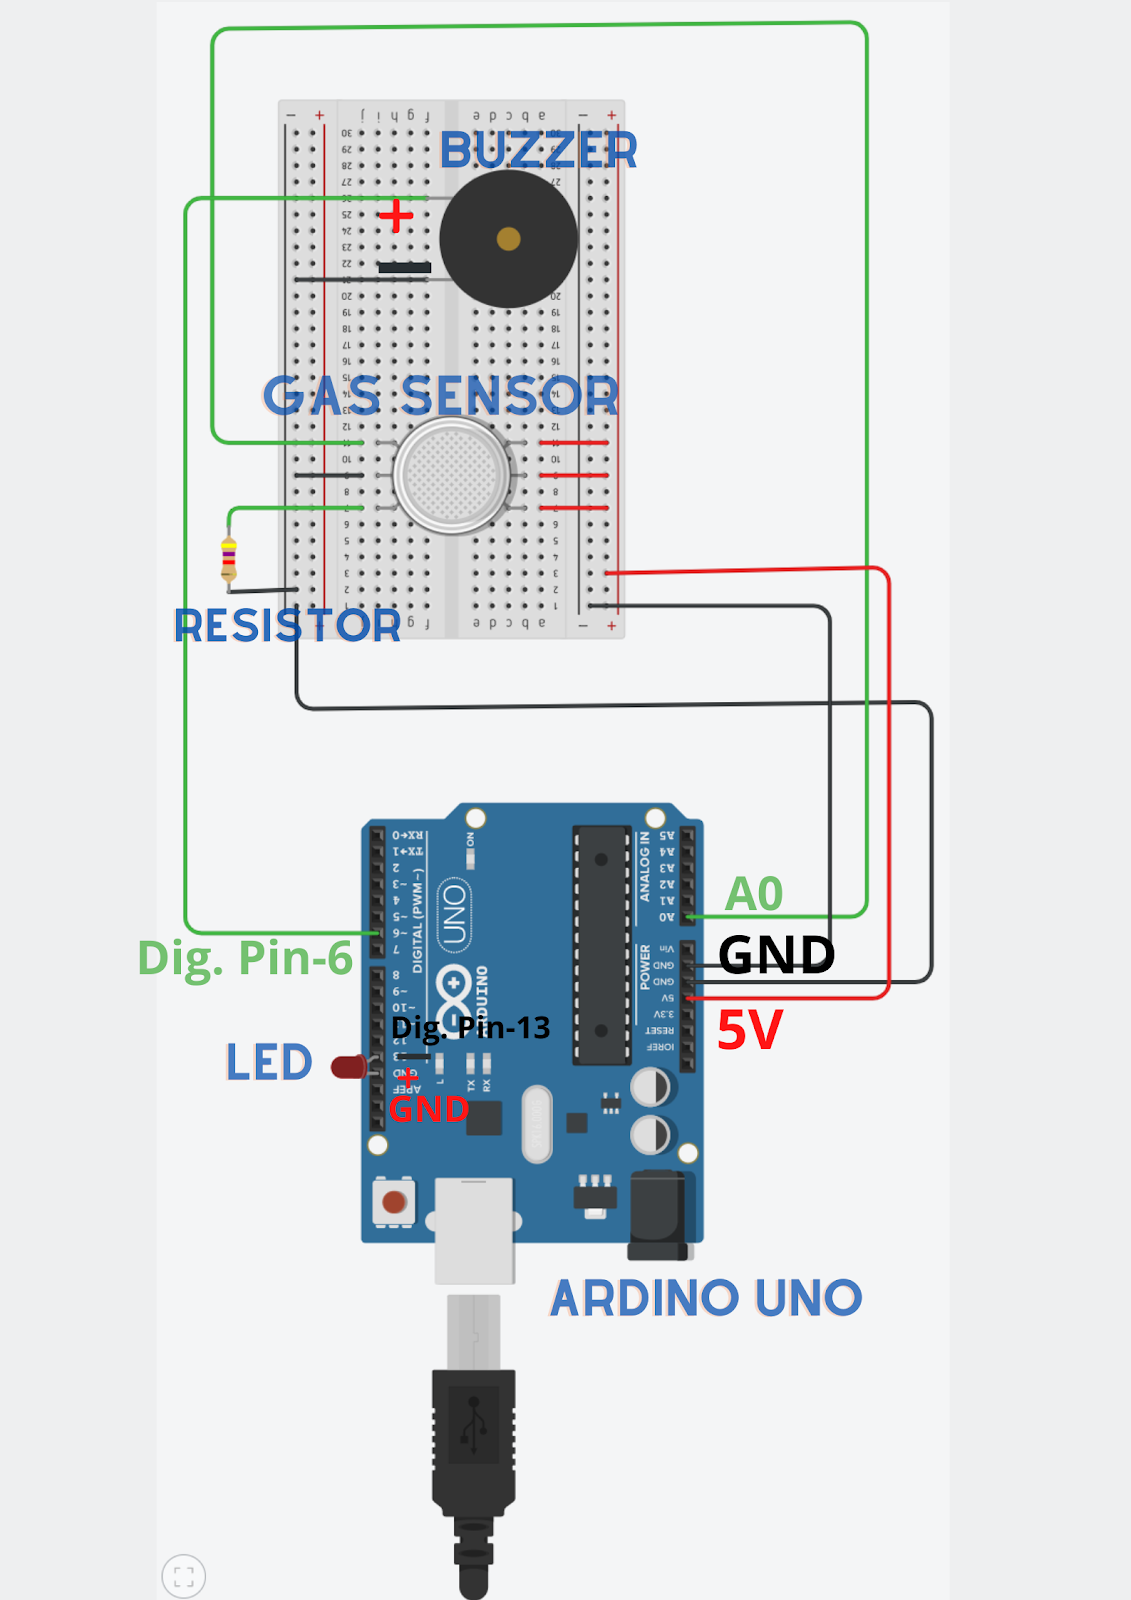
- The adjacent three terminals of the gas sensor connect to positive voltage in Arduino (5V).
- The opposite side of the gas sensor gain has three adjacent terminals. They connect:
- Ond terminal connects to the analog pin A0 in the Arduino.
- The second terminal is grounded in the breadboard.
- The last terminal connects with one of the resistor terminals.
- Another terminal of the resistor connects to the ground in the breadboard.
- Place a buzzer with the positive terminal connected to the digital pin 6, and the negative terminal is grounded.
- Finally, place the LED directly into the Arduino board with the negative terminal connected to digital pin-13, and positive with the ground connection.
So now we are ready with our components and their connections. Again check the circuit to avoid any error during the implementation.
Now let us dive into the implementation part of our project with some simple code fragments.
Code for implementation | Air Pollution Monitor

- The given code efficiently works for our project to implement it practically. The buzzer automatically beeps, and the LED starts glowing when the pollution level is out of control.
- We used three pins from Arduino, Analog pin A0, Digital-pin 6, and Digital-pin 13, declared inside the setup() section.
- We define the safe limit of pollution as less than 400. As soon it reaches 400 or crosses it, the buzzer will start beeping, and the LED glows to alert the user.
- Whenever the pollution limit exceeds, the system will start returning, pollution level exceeded, otherwise it continuously returns, pollution under control.
This project is also available via an online tool, Tinkercad. Have a look at the video provided. It shows the working and operations of the proposed project.
Source link: Air Pollution monitoring system
Note: Code or design may have changes, as tinkercad is an open platform which will also allow edit designs and manipulate the code.
Written by: Anshara Khan
Reviewed by: Batta Pruthvi
If you are Interested In Machine Learning You Can Check Machine Learning Internship Program
Also Check Other Technical And Non Technical Internship Programs