
In today’s world, human creation has left no stone unturned with unbelievable technologies that made human life so comfortable and easy.
IoT is also one among them. IoT technology is supported by a wifi module namely ESP8266.
WHAT IS ESP8266?

(Source: https://images.app.goo.gl/jupQ5R2Q4x5TPPCH6)
ESP8266 is an SoC(System on chip) device, manufactured by a Chinese company. It consists of a 32-BIt microcontroller and also a wifi transceiver(to connect it to wifi). thus, It also has 17 GPIO(general purpose input-output pins) in which 6 are used for communication with the onboard flash memory chip. It also consists of analog input.
This means we can now use ESP8266 like a normal microcontroller(similar to Arduino, 8051, etc), and also we have wifi communication available which can be used to connect to the wifi, internet and once connected to the internet there are numerous applications and projects possible in IoT.
No wonder?, why this chip is so popular, as it has innumerable applications and it is user friendly too!!!
PROGRAMMING
Many programming languages can be used to program ESP8266. The most commonly used method is the Arduino IDE, as it is very easy for beginners.
We can even program our ESP8266 in C(There are many other languages available. Do google it!!). This can be very useful as we can optimize our code, and perform some interesting kind of stuff that may or may not be possible in Arduino IDE.
Choosing the right module for your project!!!
There are many ESP8266 modules available for our various applications and projects. Let’s know how to choose the right module for your project!
1. ESP8266 SERIAL WIRELESS TRANSCEIVER MODULE

(Source: https://images.app.goo.gl/6csBa2VSY6gW9gHMA)
This module is the most used as it is cheap and can be used for basic student applications. However, in this module, the GPIO pins are less in number when compared to other modules and this module is also difficult to plug in a standard breadboard.
If you choose this module, then there are few basic projects which you might not be able to do like you cannot use the analog sensor as an analog pin is not accessible.
2. ESP8266 OLIMEX MODULE

(Source: https://images.app.goo.gl/qAMR1mrFzgKBJu3K6)
There are many modules in the market that give you access to all the pins in it. One such module is the ESP8266 OLIMEX MODULE. This is also low in cost(around $10).
As all the pins are accessible in this module and it can also be easily mounted on the standard breadboard, this is widely used in all modern-day projects.
3. ESP-12 MODULE

(Source: https://images.app.goo.gl/4QiEthTRT7CEoowPA)
Another choice for a module that gives access to all the pins and easily fits on a standard breadboard is ESP-12. The breakout board required for this is also easily available in the market.
You can use the Adafruit ESP8266 breakout board which also integrates with ESP-12.
4. NODEMCU DEVELOPMENT KIT

(Source: https://images.app.goo.gl/v2mj4xkPPRUR7XP98)
Another solution is to use the NODEMCU development kit, which is very similar to the OLIMEX board. The difference between them is NODEMCU has an integrated USB-to-Serial convertor and it also has an onboard power supply.
The module is user-friendly and has been used in many applications and projects in today’s world.
MAKING THE MODULE WORK!!
It is usually assumed that the ESP8266 module is the only element required to make a connection. This assumption is wrong?!!!
Along with the module, we also need a dedicated power supply (around 3.3v to 5v). If we use FTDI(Future Technology Devices Interglobal) boards and normal Arduino boards, it might not work properly!!
ESP8266 can perform multiple things according to instructions given. Now to give the instructions, in simple words to program it. We can use the Arduino board for it or an onboard processor as ESP8266 also works independently!!. Some boards also have an integrated micro-USB power supply which provides the required power to ESP8266.
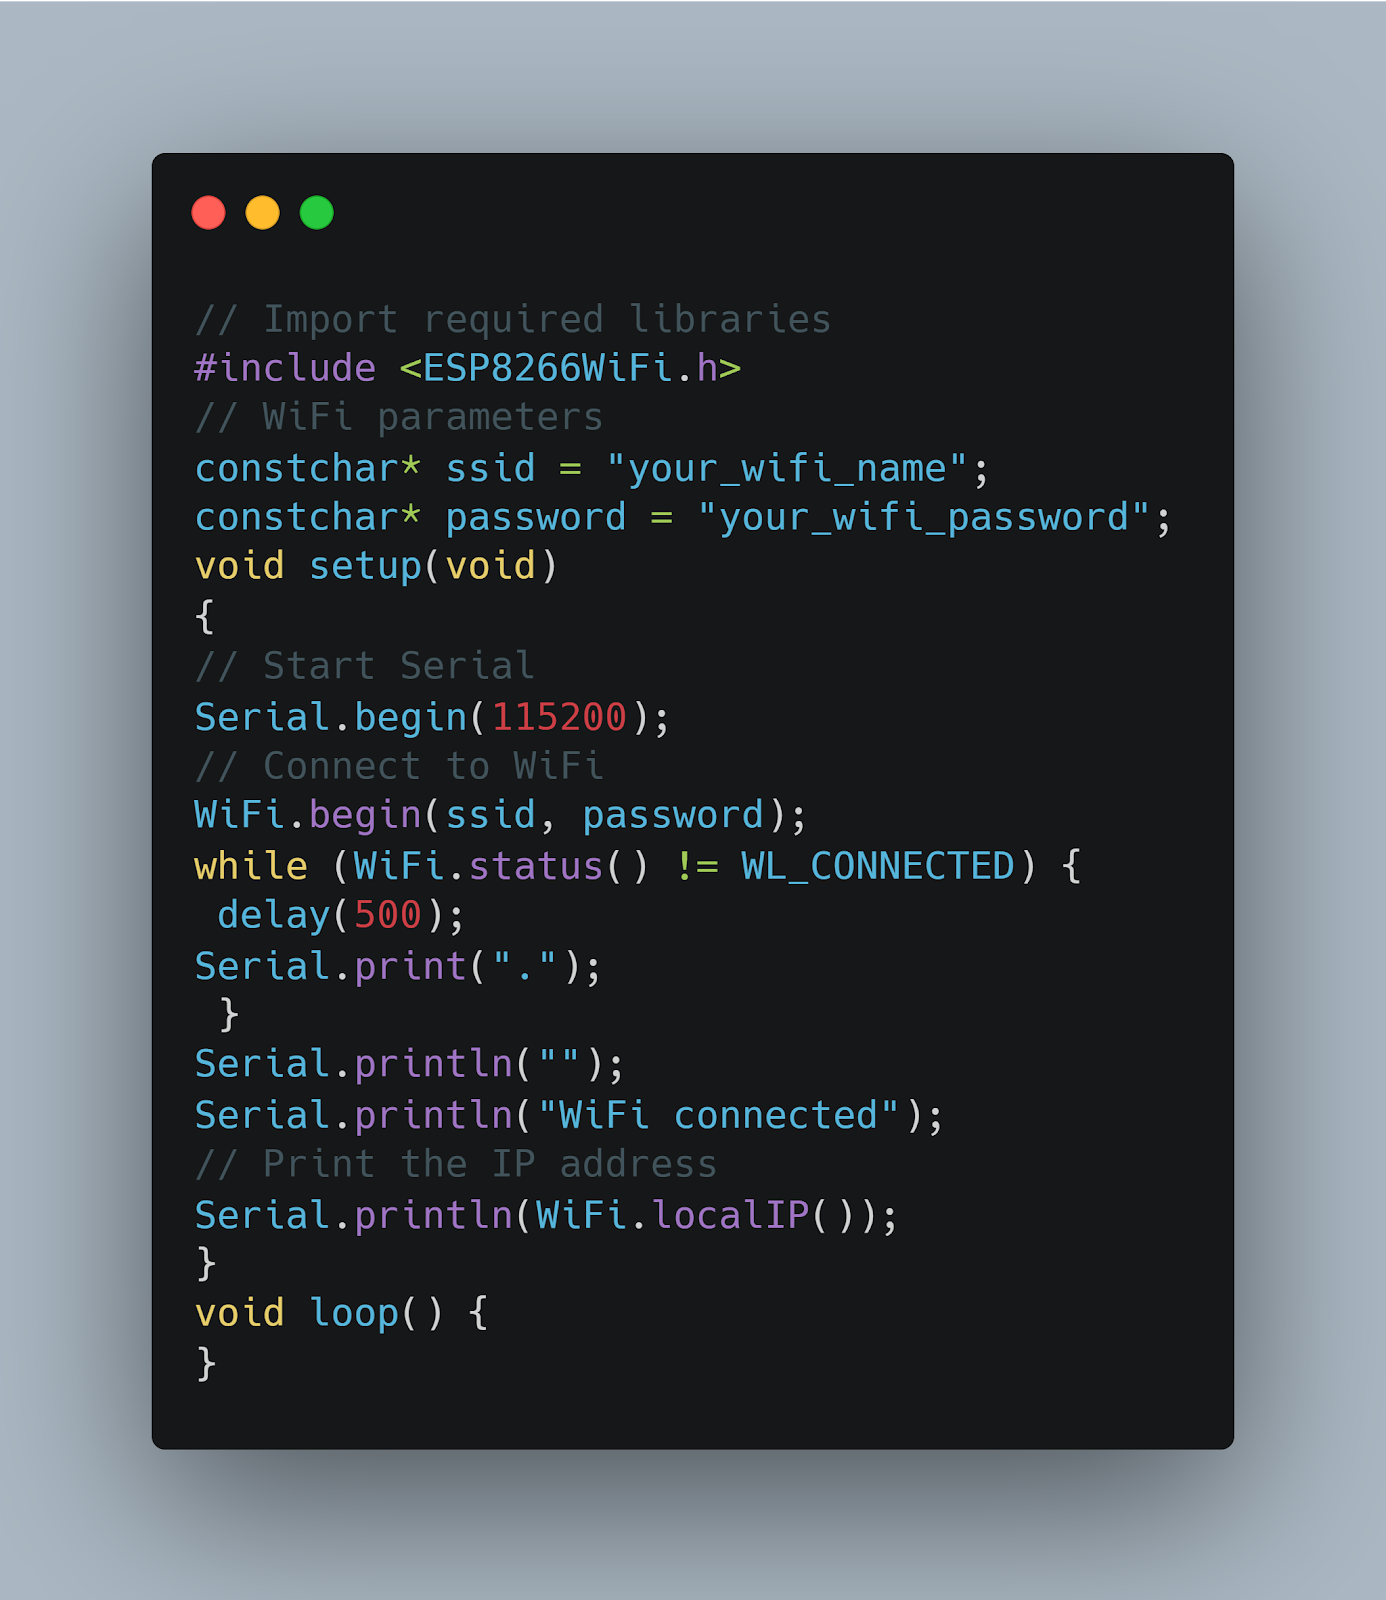
CONNECTING MODULE TO AVAILABLE WIFI NETWORK!
To connect the module to the nearby wifi network, we need to write the code, and upload it to the board. Below is the code to connect it to nearby wifi and print the IP address of the board.
This board has been around now for years and has been used for a wide range of applications in the field of IoT. It has been adopted widely due to its flexibility and range of cost!!
Hope this reading has helped you!
Written By: Apeksha Bagrecha
Reviewed By: Vishal Rathod
If you are Interested In Machine Learning You Can Check Machine Learning Internship Program
Also Check Other Technical And Non Technical Internship Programs