Introduction to Model On Heroku:
Heroku is a cloud platform as a service for many programming languages. Heroku has been in use since June 2007. Now support java, Scala, Python, Php, and Go.
so After you have developed a model, you next will make your model live and available for the users. thus, There are various platforms through which you can deploy your model. then, I will be focused on deploying models using the Heroku platform.
Requirements:
- Heroku account
- Set up a virtual environment for a Model.
- Install Heroku CLI on Windows PC
- Git installation on pc
Step-1: Copy the project separately.

Step-2: install Pipenv package.
Using this command: “pip install pipenv”.
Step-3: Installation of Heroku on Windows machine.
Download the appropriate installer for windows installation from ”https://devcenter.heroku.com/articles/heroku-cli#download-and-install” according to the system configuration.
Step-4: Installation Git on Window machine.
Download the appropriate installer for windows installation from “https://git-scm.com/downloads” according to the system configuration.
Step-5: Login on Heroku.
You can log in to CMD using the Heroku login command. so, If you have successfully installed Heroku, ask login into the browser.

so, After opening the browser click on the login button.

Step-6: Create a virtual environment.
We are creating a virtual environment because this project is isolated from all computers. Whenever we change this project does not affect the system. therefore, A Virtual environment means a safe comfort zone for our project. In windows, you can create and thus activate a virtual environment below commend.

Step-7: Create a Procfile.
Create a Procfile where your mange.py is located. however, add this “web: gunicorn app.wsgi” on your procfile. Where the app is my project name.
Step-8: Installing gunicorn.
This Procfile requires Gunicorn. It’s used to run models on Heroku. The production model that we recommend for the Django application. pip install gunicorn used for installing gunicorn.
Step-9: Installing Django-Heroku.
The Django-Heroku package automatically configures your Django application model to work on Heroku. It is compatible with Django. This command is used for installing Django-Heroku “pip install django-heroku”.
Step-10: Add stuff to settings.py file.
Add the import statement “import django_heroku” statement at top of setting.py. Then add the “django_heroku.settings(locals())” at bottom of setting.py.


Step-11: Create a requirements.txt file.
It is used to recognize which Model On Heroku server is needed for which things. This command “pip freeze > requirements.txt” is used for creating requirements.txt file.

Step-12: Heroku creates bhalalaweb (to create an app on Heroku).
In this, we have created a unique web name. Bhalalaweb is a unique name. “heroku create bhalalaweb” command used for creating web names

https://bhalalaweb.herokuapp.com/ is our website name. Let’s check on the browser.

Step-13: Check Git and initialize.
You can check git version status using the “git –version” command.

Git initializes using the “git init” command.

Then after we send our file Model On Heroku server using Git. This command “git add –all” is used for adding all files on the Git server.

We need the commit code. Then we apply “git commit -m “First Commit”” for commit all code.

After successfully committing on Github then we push all code on the Model On Heroku server. ”Git push heroku master” used commands to push all code Git to Heroku.

When we apply push we get an error like “fatal: ‘heroku’ does not appear to be a git repository, fatal: Could not read from remote repository.” The remote to Heroku to be second. We apply this “git:remote -a bhalalaweb” commend to solve this error.
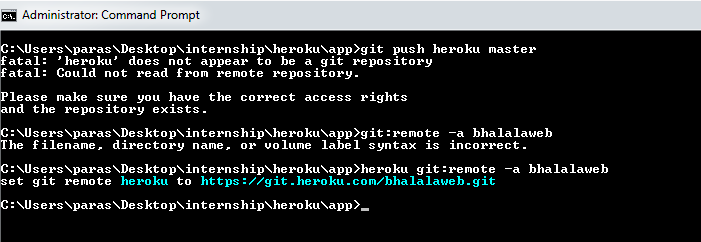
Now we are again applying this command “Git push heroku master.”
Step-14: There are other ways to deploy your Github to the Model On Heroku server. Go to https://dashboard.heroku.com/apps/bhalalaweb/deploy/github

Then Github login. After successfully login, find repo-name where you are located in Github.

Next click on the Enable Automatic Deploys button and Deploy Branch button.

After successfully deploying you get this type of massage.

Step-15:
Finally, the model is now up and running. You can open an application in the browser using the subdomain of Heroku for instance: https://bhalalaweb.herokuapp.com/ipl/index/
Conclusion:
Here we are showing the step-by-step deployment of the model on Heroku server.
Thanks for reading this blog. I hope it will make things much more clear than before reading the blog.
Written By: Paras Bhalala
Reviewed By: Rushikesh Lavate
If you are Interested In Machine Learning You Can Check Machine Learning Internship Program
Also Check Other Technical And Non Technical Internship Programs