
In this article, we’ll be telling you what OpenCV is, where it’s used, how to install it. However, how to implement it which includes loading of images, videos, live webcams and performing image processing and machine learning applications like face detection using haar cascade.
About OpenCV
The CV in OpenCV stands for computer vision. It is a library that helps perform different functions on images and videos through its inbuilt software algorithms. thus, OpenCV was first introduced in the 1990s and in the year 2000, it turned its beta version was released to the public. Higher versions were later introduced in the years 2006, 2008 and 2009. Currently, the latest version of OpenCV is OpenCV v2.3. Initially, OpenCV used as a C Library which later got compatibility with C++ too. Now the latest libraries are also compatible with python and easy to implement.

Image Source: OpenCV – Wikipedia
Functions
- Gui features like save, delete, & alsotrack.
- Core operations like pixel editing, optimization of images, & also performing mathematical tools.
- Different ways of image processing can be implemented
- It can also be used for feature detection through its wide range of packages like Haar Cascade.
- Analysis of videos and also making alterations.
- 3D Reconstruction and Camera Calibration
- It can also be used for multiple machine learning implementations like CNN
- thus, Detection of objects like a human face.
Latest Libraries for openCV
Image detection and analysis have also gotten more advanced in recent time. then, Each day we witness new libraries and newer versions of libraries showing up with more advanced and efficient features. Some of them include the YOLO library which is way more efficient when it comes to real-time object detection. Object detection can also be otherwise initiated through OpenCV by just utilizing the image segmentation features and some other libraries for detection purposes.
Other libraries also include PIL/Pillow, Scikit-images, pgmagick, SimpleITK, Mahotas, etc.
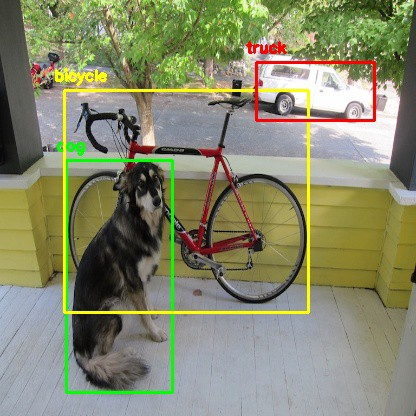
Image Source: darknet github repo
Installation
Packages for standard desktops environments like Windows, macOS and also any Linux/GNU distribution-
- Main modules packages :
pip install opencv-python
- Full package (contains both main and extra modules) :
pip install opencv-contrib-python
- For anaconda packages:
conda install -c conda-forge opencv
Implementation
Basic GUI Implementation
Load Image
We use import cv2 to import the library.
cv2.imread() reads the images.
To input images in a certain way
- cv2.imread_color() loads a color image ignoring the transparency part.
Or
cv2.read(‘title’, xyz.png, 1) or cv2.read(xyz.png) #default state
- cv2.imread_grayscale() loads an image converting it to grayscale
Or
cv2.read(‘title’, ‘xyz.png’, 0)
- cv2.imread_unchanged() loads image thus including alpha channel
Or
cv2.read(‘title’, ‘xyz.png’, -1)
import cv2
img = cv2.imread(‘image.jpg’,0)
Display Image
cv2.imshow() displays the image inserted through the imread() function. Multiple windows are allowed to be created but each with a different name.
cv2.waitkey() waits for the amounts of milliseconds in parentheses and if any key is pressed within those milliseconds, the program just proceeds without the image loading.
cv2.detroyAllWindows() is used to end all the windows we created and if we need to destroy just some specific window then use cv2.destroyWindow() specifying window’s name along.
cv2.imshow(‘image’,img)
cv2.waitKey(0)
cv2.destroyAllWindows()
Save Image
cv2.imwrite(), as the title says, this is to save the image or write it.
cv2.imwrite(‘image.png’,img)
Video accessing
Load Video
import cv2
cap = cv2.VideoCapture(0)
#turning on webcam
while(True):
#capturing video
ret, success = cap.read()
# Display the resulting frame
cv2.imshow(‘Webcam’,success)
#adds delay
if cv2.waitKey(1) & 0xFF == ord(‘q’):
break
# When everything done, release the capture
cap.release()
cv2.destroyAllWindows()
Playing video from the device
import cv2
cap = cv2.VideoCapture(‘random_vid.mp4’)
#setting size of window
cap.set(3,640) #width 640
cap.set(4,480) #height 480
cap.set(10,100) #brightness 100
while(True):
ret, video = cap.read()
# add gray scale to video loading, optional
gray_video = cv2.cvtColor(video, cv2.COLOR_BGR2GRAY)
cv2.imshow(‘Video’,gray_video)
if cv2.waitKey(1) & 0xFF == ord(‘q’):
break
cap.release()
cv2.destroyAllWindows()
Image Processing
Gray Conversion
We first load the image using cv2.imread()and that image is then ran under cv2.cvtColor() to change colour of images loaded. Then we use cv2.imshow() to display it.
img = cv2.imread(‘some_face.jpg’)
gray = cv2.cvtColor(img, cv2.COLOR_BGR2GRAY)
cv2.imshow(‘grey image’, gray)
cv2.waitkey(0)
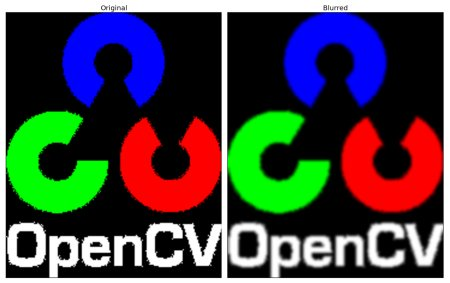
Blurring of image
As the name suggests, it blurs the image to the required level. We use GaussianBlur here while there are many other methods like Averaging, Median Filtering, Bilateral Filtering.
In Gaussian Blur, we first define the kernel and second we define the standard deviation in the X & Y direction, SigmaX and SigmaY. If only one defined then both are considered the same.
blur = cv2.GaussianBlur(img,(5,5),0)

Resizing and Cropping
We first load the image using cv2.imread() and then cv2.resize() command for resize while image_name[dimensions] for cropping.
img = cv2.imread(‘some_image.jpg’)
img_resize = cv2.resize(img , (200,200))
cv2.imshow(‘Resized image’, img_resize)
cv2.waitkey(0)
img = cv2.imread(‘some_image.jpg’)
img_cropped = img[0:200, 0:200]
cv2.imshow(‘Cropped image’, img_cropped)
cv2.waitkey(0)
Live Detection Using Haar-cascade
OpenCV gives you options to either train your own set or use pre-trained models for classification of body, eyes, nose, face etc. For the pre-trained classifiers there are XML files stored in the haarcascade folder downloaded with OpenCV.
Here we loaded our classifier for full face and eyes. We just need to access the XML files using cv2.CascadeClassifier command.
Following that we need to read the image and convert it to Gray using cv2.cvtColor() for a better implementation.
import numpy as np
import cv2
face_cascade = cv2.CascadeClassifier(‘haarcascade_frontalface_default.xml’)
eye_cascade = cv2.CascadeClassifier(‘haarcascade_eye.xml’)
img = cv2.imread(‘some_face.jpg’)
gray = cv2.cvtColor(img, cv2.COLOR_BGR2GRAY)
We converted the ‘img’ image to grey in colour and now we detect that face using detectMultiScale(). We get the face in a rectangular box with (x, y, w, h) dimensions where ‘x’ & ‘y’ are the values on the scale while ‘w’ stands for width and ‘h’ stands for height. From that box created over the face, here ‘faces’ will have the eye detection running on them since this way the image will be filtered to just face and will be more efficient for the classifier to run.
faces = face_cascade.detectMultiScale(gray, 1.3, 5)
for (x,y,w,h) in faces:
img = cv2.rectangle(img,(x,y),(x+w,y+h),(255,0,0),2)
roi_gray = gray[y:y+h, x:x+w]
roi_color = img[y:y+h, x:x+w]
eyes = eye_cascade.detectMultiScale(roi_gray)
for (ex,ey,ew,eh) in eyes:
cv2.rectangle(roi_color,(ex,ey),(ex+ew,ey+eh),(0,255,0),2)
cv2.imshow(‘img’,img)
cv2.waitKey(0)
cv2.destroyAllWindows()
Final Note:
however, These were just a few of the basic commands of OpenCV and their explanation and usage. To read about multiple other features and in-depth,
refer OpenCV-Python Tutorials for a higher in-depth reference.
Thank You!
written by: Sparsh Nagpal
reviewed by: Savya Sachi
If you are Interested In Machine Learning You Can Check Machine Learning Internship Program
Also Check Other Technical And Non Technical Internship Programs