
In this blog, we would be going through the initial concepts of computer vision and then try to design a basic motion detector using the same.
Let us start with a basic introduction to the OpenCV library.
Open Computer Vision (OpenCV) a python library, written in C++ powered by deep learning algorithms, designed by neural networks, called convolutional neural networks (CNN) to understand the sense of images.
however, These are trained by deploying an enormous sample of images that aid down the algorithm to acquire. thus, it determine everything that is present in the images. then categorize image elements by analyzing contours and colors of images.
Computer vision can be considered as a part of artificial intelligence, where computers are trained with machine learning and deep learning algorithms, such that they become capable to recognize and process the objects from the video/images same as a human recognizes.
Some applications of Computer vision includes:-
- Face Recognition (filter and identify an individual in the pictures)
- Image Retrieval (the algorithm first examines the content in the inquiry image and then give outputs depending upon best-matched content)
- Biometric Systems (commonly deployed methods in the biometric description such as fingerprint, iris, and face matching)
- Surveillance (Surveillance cameras used to observe doubtful activities)
Etc.
Now let us try building a basic motion detector using OpenCV.
Motion Detector Project Overview:
Here we would detect motion from the default webcam using OpenCV where a bounding box will be rendered to the motion detected frames. Now we know that multiple frames are stacked together to form videos. For motion detection, we would calculate the absolute difference between two continuous frames and if the difference is found to be higher than the set threshold, a motion would be detected.
Coding our motion detector:-
We begin by importing the necessary libraries required,
Here we would be importing the required libraries of cv2 (OpenCV) and NumPy. OpenCV would be used to preprocess images(since videos are generally a combination of images).

Assignment of a static frame to compare with-
We need to compare every frame with the first frame that will be termed as a static frame. So every time based on the difference any motion in the frames would be detected. Initially, the static frame will be None and further be initialized with the first frame once the web camera opens.
Create an object to capture video-
To capture a live stream the first step would be to create a VideoCapture object by passing 0 as an argument to signify the camera to use(default webcam in our case). Then, we would run while loop, to capture every frame from the webcam and run until the camera gets closed.

Reading the frames and converting them to grayscale
Now read the frames using the object initialized above and further convert it into the grayscale format.

Image Blurring
Now the next step is to remove the noise from each frame i.e basically remove high frequencies from the images. After blurring the image, motion in the consecutive frames would be detected easily.

Update Static Frame
Now update the static frame with the first frame from the webcam which was initially None as no changes in the initial level. Now, this frame would be use as a reference to calculate the absolute difference between consecutive frames.

Calculate the abs difference in the frames to detect motion
Calculate the absolute difference between the initial frame(static frame declared) and further consecutive frames captured from the webcam. Wherever the difference is find to be greater than 30, apply thresholding to the grayscale so as to wherever the motion is detect that region would be white and later dilate that threshold image.

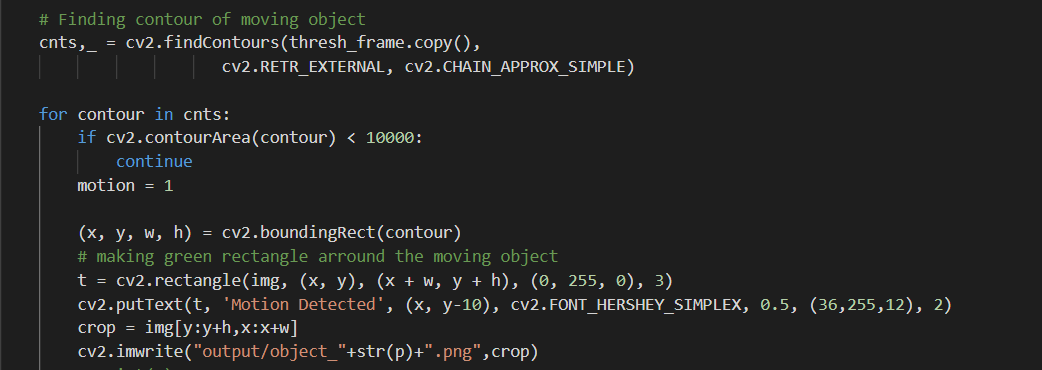
Finding Contours
Now that the region of motion has been converted to the white using thresholding, which is treat as contours, so use find contours to detect coordinates of the moving objects. Now we would get the coordinates of the moving objects and plot the rectangle (bounding box) on them and put the text as “Motion Detected” to display on the output screen every time motion is detect.
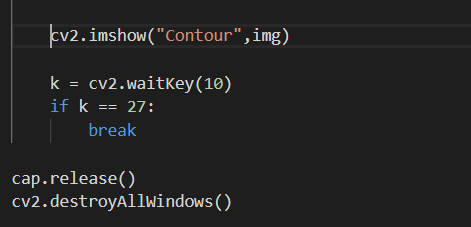
Displaying the final frames live
Now the motion has successfully been detected in the video. the next step is with results of motion detection. Lastly, release the camera and destroy all the windows.
Conclusion
Out of its vast applications of OpenCV, this particular blog has been frame to cover one of that. Motion Detection based on background subtraction from the live streaming, where each new frame will be subtracted from the very first frame.
however, after image smoothening and if any region has a value less than some threshold, that signifies the motion detection in the frames. Later using contours, plot the bounding boxes on the region where motion has been detected.
Hope you found the blog interesting.
Thank you and happy reading….
Written By: Rohit Kumar Mandal
Reviewed By: Rushikesh Lavate
If you are Interested In Machine Learning You Can Check Machine Learning Internship Program
Also Check Other Technical And Non Technical Internship Programs