

Have you ever wondered what bitcoin is? Now to understand the concept of bitcoin you need to know cryptocurrency.
Cryptocurrency is a kind of digital currency; which is meant for complete online transactions whether it is bill payment or person to person transfer, it is completely online! Therefore “Banks” are thus completely eliminated here. We might use cryptocurrencies for zero transaction fee payments too. Like mutual funds, cryptocurrency can also be used as a means to invest money, you can sell it when the market values higher and purchase more of it when it’s value goes down. People can purchase it via credit card or, through a process called “mining.”
Bitcoin
Bitcoin is among the most popular cryptocurrencies in the world, created by Satoshi Nakamoto. It is not a physical currency but actually is a computer file which can be tracked through a digital wallet on a pc or mobile smartphone. People can transfer it and every single transaction of bitcoin is recorded in a public list which is called, blockchain.
Now, the price of bitcoin varies dynamically, and it is totally unpredictable. That’s why we need to keep ourselves regularly updated once we have invested in the cryptocurrency market.
So now let’s take a deep look at how to create our Bitcoin Tracking System using the Bolt IoT wifi module step by step.
Hardware Required:
- Bolt IoT Wifi Module
- Buzzer
- LED
- Jumper Wires
- Breadboard (mini)
- Resistor ( 10k ohm)
Software Required:
- Ubuntu / Linux Environment
- Bolt Cloud
- Twilio Account
- Mailgun account
Schematic diagram:

EXPLANATION OF THE PROJECT:
We have already understood the project’s purpose and the hardware and software requirements, so let’s move on to compiling things together by writing a proper code.
Step-1) Setting-up your Bolt IoT Wifi Module.
First of all, you need to get ready with your Module, for which take out the specified hardware and sign-up to the bolt cloud if you have not done it already and connect your device to your Bolt cloud.
Step-2) Preparing Linux server
If you already have a Linux environment then go ahead otherwise if you are a windows user then you can also use a VirtualBox, VMWare or digital ocean to create an ubuntu server image.
Step-3) Signing in to Twilio:
Now sign in to Twilio and use the mobile number in which you want the SMS as To_Number and you will be given a From_Number, SID, and Authorized token for embedding in the code so just note down all the specifications for future use.
Step-4) Signing in to Mailgun:
Similarly sign in to the mailgun providing the mail id on which you want to get notified and note down the MAILGUN_API_KEY, SANDBOX_URL, SENDER_EMAIL, and RECIPIENT_EMAIL and keep them safe for future use.
Step-5) Assembling the circuit:
With reference to the circuit diagram shown above you can easily connect the hardware properly, and now to need to create the code. Code for your project is just like what your mind is for your body.
Indicator LEDs:
The Stable Blue Led: When your module is ready to get connected to the cloud i.e. it has a good power supply.
Green Led: This shows your module is now connected with the Bolt Cloud.
- First of all power on the module and connect to a suitable hotspot using your bolt android app.

Step-6) Writing the code:
At first, we import important libraries and files which we are going to use. You can exclude the conf python file if you initialize all the API Key, the ID of the device, SID, and other details in the same file itself. On the other hand, JSON is used for converting and analyzing received string.
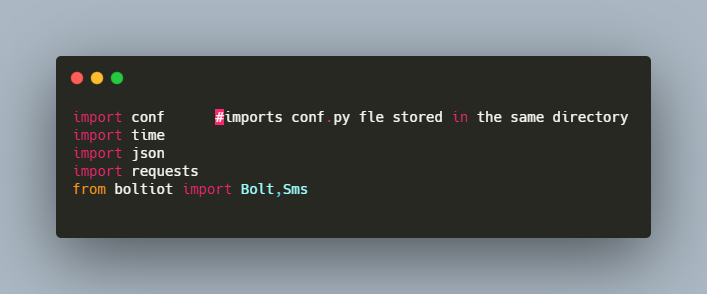
- We also need to create an object to fetch the data from the bolt cloud. so, A variable ‘bolt’ is created for passing your API_Key and Device_ID to the cloud.
- thus, I have created a separate conf.py file which I am importing here to pass the necessary details.
The below code snippet will be getting up your SID, Auth_token, To_Number, and From_Number which you have previously initialized at the conf.py file. so, Do make sure that you have entered the correct values in the configuration file (conf.py)

This will ask the user to choose the currency and after that, it demands the user’s specified selling price with which it will be comparing every time for each fluctuation.

Below code snippet checks for the current bitcoin value in the same currency as entered by the user.

Here comes the main code block which compares the current market bitcoin value with the selling price entered by the user and notifies the user every time whenever the market value goes above or below the selling price. It checks for any change, every 30 seconds.
The led is on when the user’s selling price is greater than the current market value that is whenever it is favouring the user and the buzzer beeps whenever the user is at the loss of selling i.e. when the selling price is lesser than the market’s current value.
However corresponding e-mail and SMS are always sent to the user stating the current status and suitable advice.

For full project code, you can refer to the following snippet:

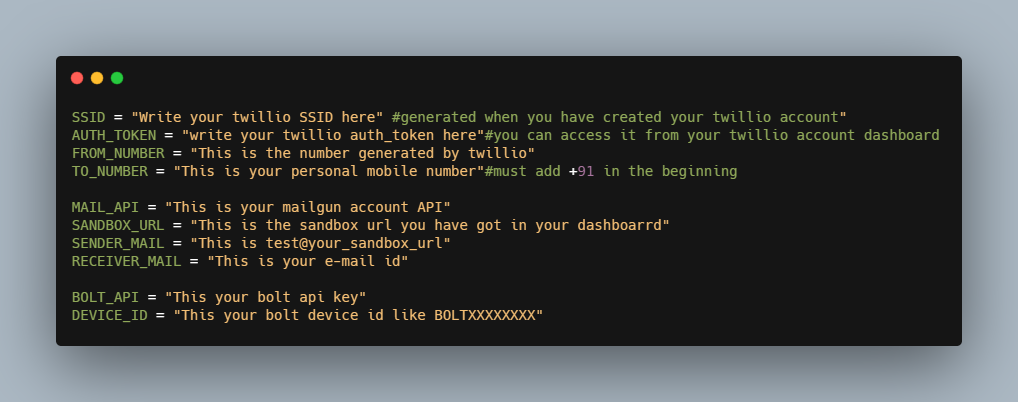
Below is the configuration file which you can either create separately and can import later on in the main source code or you can write the specifications in the main file itself.
OUTPUT at the ubuntu server :

The user is first asked the currency in which he wants to invest.

Once entering the currency type he will be asked the selling price he wants to specify for regular updates.
As soon as he enters the price, it prints the current market value and checks for any fluctuation and in case if it is there it notifies the user with SMS and e-mail and alerts him via led or a buzzer.
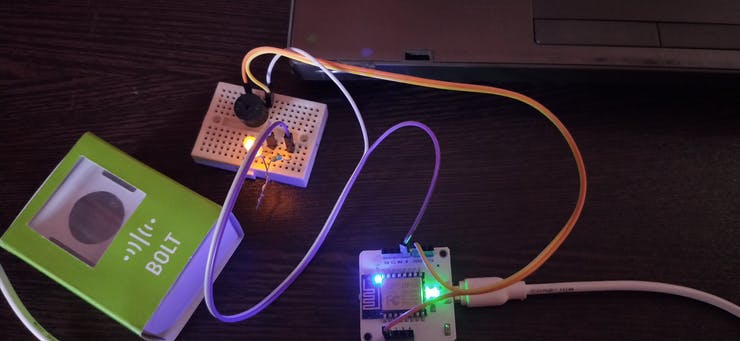
so, Above is the output at breadboard and SMS by Twilio at mobile.

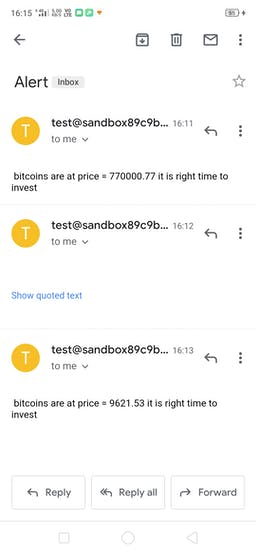
Following e-mail is the alert message at mailgun :
Conclusion | Bolt IoT
Once you have covered all the concepts and procedures explained you will definitely be able to design the Bolt IoT project for Bitcoin Value Tracking System with appropriate hardware and software requirements.
Written By: Priyanshi Omer
Reviewed by Batta Pruthvi
If you are Interested In Machine Learning You Can Check Machine Learning Internship Program
Also Check Other Technical And Non Technical Internship Programs